feathers:Starlingフレームワーク用UIコンポーネント
2012/10/11
category: Feathers | tag: ActionScript, AIR, FlashBuilder, Starling | no comments
feathersはStarlingフレームワーク用のオープンソースのUIコンポーネントです。
feathers
ボタン、リスト、タブ、プログレスバー、スライダー、他のUIコンポーネントが用意されています。
独自の画像を用意する事で見た目をカスタマイズできます。
Starlingフレームワークのwikiにあったサンプル(Getting Started with Feathers)を参考に、試してみました。
1. プロジェクトの作成
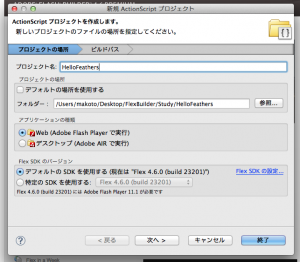
Action Script プロジェクトを作成します。

プロジェクト名を設定して「次へ」をクリックします。

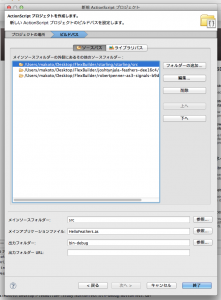
ソースパスを設定します。
Starling, Feather, as3-signalsの3つのフォルダを追加します。
※ feathersでは、as3-signalsを使用します。あらかじめダウンロードして、一緒に使えるようにしておきます。
「終了」をクリックしてプロジェクトの作成を終了します。
2. Starlingのお約束
Stage3Dをブラウザ上のFlashプラグインで表示するには「wmode」パラメータを「direct」に設定する必要があります。
html-templateフォルダのindex.template.htmlファイルを編集します。
|
1 2 3 4 5 6 7 8 9 10 11 12 13 14 15 16 17 18 19 20 21 22 23 24 |
<script type="text/javascript"> // For version detection, set to min. required Flash Player version, or 0 (or 0.0.0), for no version detection. var swfVersionStr = "${version_major}.${version_minor}.${version_revision}"; // To use express install, set to playerProductInstall.swf, otherwise the empty string. var xiSwfUrlStr = "${expressInstallSwf}"; var flashvars = {}; var params = {}; params.quality = "high"; params.bgcolor = "${bgcolor}"; params.allowscriptaccess = "sameDomain"; params.allowfullscreen = "true"; params.wmode = "direct"; var attributes = {}; attributes.id = "${application}"; attributes.name = "${application}"; attributes.align = "middle"; swfobject.embedSWF( "${swf}.swf", "flashContent", "${width}", "${height}", swfVersionStr, xiSwfUrlStr, flashvars, params, attributes); // JavaScript enabled so display the flashContent div in case it is not replaced with a swf object. swfobject.createCSS("#flashContent", "display:block;text-align:left;"); </script> |
12行目 wmodeをdirectにします。
3. 画像を用意
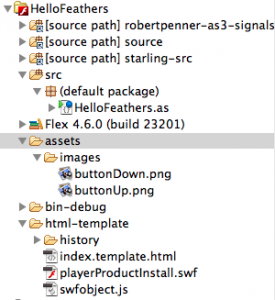
プロジェクトにフォルダを作成して、画像ファイルを追加します。

4. コーディング
|
1 2 3 4 5 6 7 8 9 10 11 12 13 14 15 16 17 18 |
package { import flash.display.Sprite; import starling.core.Starling; [SWF(frameRate="60", width="320", height="240", backgroundColor="#f0f0f0")] public class HelloFeathers extends Sprite { private var myStarling:Starling; public function HelloFeathers() { myStarling = new Starling(Main, stage); myStarling.start(); } } } |
|
1 2 3 4 5 6 7 8 9 10 11 12 13 14 15 16 17 18 19 20 21 22 23 24 25 26 27 28 29 30 31 32 33 34 35 36 37 |
package { import feathers.controls.Button; import starling.display.Image; import starling.display.Sprite; import starling.events.Event; public class Main extends Sprite { [Embed(source="../assets/images/buttonUp.png")] private static const ImageButtonUp:Class; [Embed(source="../assets/images/buttonDown.png")] private static const ImageButtonDown:Class; public function Main() { this.addEventListener(Event.ADDED_TO_STAGE, onAddedToStage); } private function onAddedToStage(e:Event):void { var buttonUp:Image = Image.fromBitmap(new ImageButtonUp()); var buttonDown:Image = Image.fromBitmap(new ImageButtonDown()); var button:Button = new Button(); this.addChild(button); button.defaultSkin = buttonUp; button.downSkin = buttonDown; button.validate(); button.x = (stage.stageWidth - button.width) * 0.5; button.y = (stage.stageHeight - button.height) * 0.5; } } } |
5. 実行結果
状態によって画像の入れ替わるボタンができました。
マウスのイベントを意識せず、画像を用意するだけでボタンができるのは便利だと思いました。
他のUIコンポーネントも試してみたいと思います。


コメントを残す
コメントを投稿するにはログインしてください。